티스토리 뷰
Gitlab은 OIDC provider로서 동작하여 등록된 사용자를 oauth authenticate 및 authorization에 사용할 수 있게 해준다.
실제 OIDC provider 로써 어떻게 해야 동작되며 이를 어떻게 client side에서 설정하는지에 대하여 알아보도록 하자.
How to setup
먼저 gitlab과 grafana를 준비하자.
(간단하게 테스트로 알아보기 위해 docker-compose로 구동을 시켜보았다.)
Gitlab
Gitlab은 구동시 별도의 작업을 해줄 필요는 없다.
다만 expire token과 같은 기능을 사용하고자 한다면 버전확인을 하고 Gitlab을 구동해줄것을 권장한다.
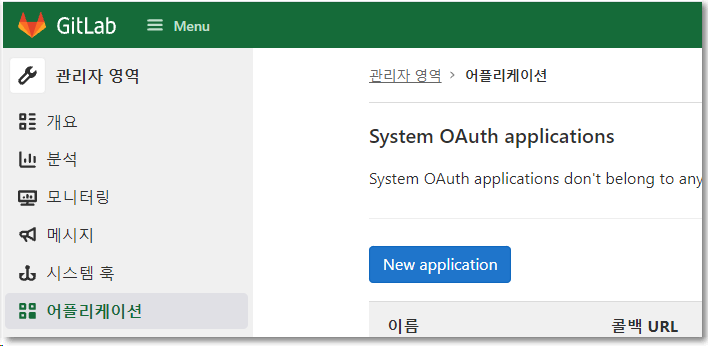
application 화면에서 다음과 같이 설정을 진행한다.
먼저 아래 메뉴화면에서 application을 생성한다.

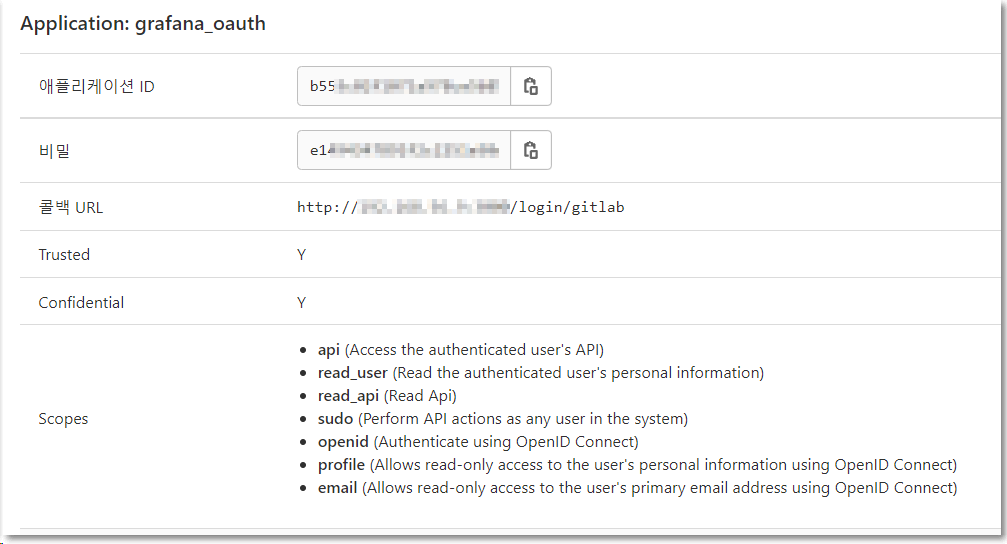
여기서 중요한것은 read_api 권한과 redirect URI 이다.
(grafana 에서는 login/gitlab subpath를 사용하라고 한다.)

(참고로 아래 Grafana 설정에서는 grafana.jacobbaek.com를 사용했다.)
생성을 하게되면 다음과 같은 정보로 생성된것을 확인할 수 있다.

Grafana Oauth 설정
이제 Grafana에서 auth.gitlab section을 추가해보자.
아래와 같은 설정을 grafana.ini에 추가 및 수정하자.
# https://raw.githubusercontent.com/grafana/grafana/main/conf/defaults.ini

...

#################################### Server ##############################
[server]
# Protocol (http, https, h2, socket)
protocol = http

# The ip address to bind to, empty will bind to all interfaces
http_addr =

# The http port to use
http_port = 3000

# The public facing domain name used to access grafana from a browser
domain = grafana.jacobbaek.com # <== domain 설정이 잘못되면 redirect가 잘못된 주소로 이루어질수 있다.

...

[auth]

...

# URL to redirect the user to after sign out
signout_redirect_url = http://grafana.jacobbaek.com/login/gitlab

# Set to true to attempt login with OAuth automatically, skipping the login screen.
# This setting is ignored if multiple OAuth providers are configured.
oauth_auto_login = true

...

[auth.gitlab]
enabled = true
allow_sign_up = true
client_id = b553c0xxxxxxxxxxxxxxxxxxxxxxxxxxxxxxxxxxxxxxxxxxxxxxxxxxxxxxx1be1dc1
client_secret = e14943xxxxxxxxxxxxxxxxxxxxxxxxxxxxxxxxxxxxxxxxxxxxxxxxxxxxxxxe366f
scopes = read_api
auth_url = https://gitlab.jacobbaek.com/oauth/authorize
token_url = https://gitlab.jacobbaek.com/oauth/token
api_url = https://gitlab.jacobbaek.com/api/v4
tls_skip_verify_insecure = true
allowed_domains =
allowed_groups =
위와 같이 설정을 하고 grafana를 (재)구동해보자.
테스트
위와 같이 grafana 설정 및 gitlab application 생성을 완료하고 grafana 주소로 이동하면 로그인화면으로 gitlab의 로그인화면을 확인할 수 있다. 만약 gitlab에 사전에 로그인되어 있는 경우라면 자동으로 grafana에 로그인된 화면이 출력된다.
NOTE
참고로 gitlab에서 로그아웃을 하지 않는 이상 grafana 설정중 oauth_auto_login = true 설정에 의해
로그아웃함에도 다시 로그인된다.
참고사이트
'DevOps > System&Tools' 카테고리의 다른 글
| GitLab with pages (2) | 2022.04.05 |
|---|---|
| x509: certificate signed by unknown authority (0) | 2022.03.25 |
| Grafana with okta (0) | 2021.10.19 |
| Ansible dynamic global variable (0) | 2021.09.11 |
| advanced formatted message using the mattermost attachments (0) | 2021.07.05 |
- Total
- Today
- Yesterday
- openstacksdk
- minio
- ceph
- Terraform
- OpenStack
- Jenkinsfile
- GateKeeper
- mattermost
- azure policy
- K3S
- ansible
- jenkins
- kubernetes install
- open policy agent
- wsl2
- kata container
- openstack backup
- nginx-ingress
- DevSecOps
- boundary ssh
- socket
- Helm Chart
- aquasecurity
- macvlan
- metallb
- crashloopbackoff
- minikube
- hashicorp boundary
- vmware openstack
- kubernetes
| 일 | 월 | 화 | 수 | 목 | 금 | 토 |
|---|---|---|---|---|---|---|
| 1 | 2 | 3 | 4 | 5 | 6 | 7 |
| 8 | 9 | 10 | 11 | 12 | 13 | 14 |
| 15 | 16 | 17 | 18 | 19 | 20 | 21 |
| 22 | 23 | 24 | 25 | 26 | 27 | 28 |
